So, my latest fibre project has been a knitted Monmouth cap. This is because the new Festival site is freezing, and I was forced to abandon all pretence of Periodicity (in favour of not losing my ears to frostbite) and wearing a modern hat. So this Festival, I'd like to have at least two Monmouth caps to keep my head warm.
The original monmouth caps were knitted in wool and then fulled for extra wind-cutting protection. Now, m=fulling is not a skill I'm good at yet - so I decided I'd start by knitting a well-fitted one in unfulled wool first - to get a gauge on the pattern I'd require... then I'd make one slightly larger to full.
So my first cap is knitted in a nice, red 8-ply wool. The only current extant monmouth cap is brown in colour with quite thick wool - but tudor knitted caps and accounts of the time-period describe caps of black and sometimes even red. Thus my choice of colour. The extant one is very thick wool (what would perhaps be a modern 12ply), but finer caps for gentleman were apparently known - and tudor flat-caps are also in much finer weight - so I'm fairly happy that my choice of wool for this project is not too far out of line.
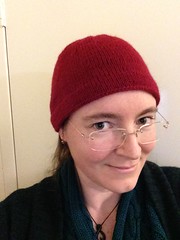
It's turned out really nicely.
What I did to achieve this follows
Equipment
You need:
- two pairs of circular knitting needles OR two sets of double-pointed needles (at least 7 needles total). I used 4mm (size 8) double-pointed needles.
- one crochet-hook of *roughly* the same size as your needles (but there's a fair big of flexibility with that - anything from 3-5mm will do fine)
- about 100gm of 8ply wool (usually 2 balls).
- some kind of measuring tape and probably a wool needle.
Note: I'd avoid slippery-smooth wool with double-pointed needles first your first go-through, unless you're a reasonably confident knitter - as it makes it just that much harder.
Step 1 - knitted swatch
The knitted swatch is a non-optional choice when making a hat. Hat's must fit you closely. Too large and they will be loose and won't keep you fully warm, too small and they will creep up off your head. So a swatch will give you an accurate gauge of how many stitches to cast on to give your hat a cozy fit.
I knitted a swatch that was about 20 stitches wide and only knit it for about 6 rows. you don't need to worry about row-height as you'll figure that out as you go. But width is very important.
Step 2 - measurement and stitch-estimation
I measured how many stitches are in 10cm when the swatch was lying on the table relaxed... but then I remembered that hats need to be *slightly* stretched in order to fit snugly. So I measured it under slight tension too. Call this value Sper10
Then I took the measurement of my head in cm and multiplied like this: stitches = Sper10 * HeadMeasurement / 10.
If I used the "lying flat" measurement, it came to 134 stitches. With the "slightly stretched" measurement it came to 112 stitches.
I chose to use 120 stitches. It's a good compromise between the two, and 12s have a lot of factors. Given that part of the Monmouth-cap pattern requires you to do regular decreases, having lots of factors to divide the stitches by is really useful - because it gives you lots of options.
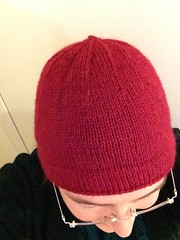
You should also measure you head "height". I recommend measuring from left ear to right ear - making sure you pass the measuring tape over the crown of your head (which is far to the back of your head). You want the tape to go over the direct centre of where your hat will sit. Have a look at where the crown of my cap sits on my head in the picture, for reference. For me, that measurement was 45cm. About half of this is roughly how many rows we will be knitting in total.
If you look at my pic above, you can see that roughly one third of this "height" (from ear-to-ear) is in the top-section, the part with the decreases. With another third each from there to each of my ears. So one third of my "height" number should go into the "body" of the hat (the cylindrical bit that we knit before we start decreasing). Remember that number.
Step 3 - cast on
So now I had my stitches, I could cast on that number.
A hat is circular in nature, so it calls for circular knitting. you can use a circular needle if you like, or go full-period and try proper double-pointed needles. You can either use three or four needles - whichever feels more comfortable for the number of stitches. Just divide the number of stitches evenly between them.
You can use whatever cast-on technique you like, but be aware that later you will be picking up stitches along the cast-on edge (to join the brim to itself). So I personally chose the crocheted invisible cast-on technique, which allowed me to transfer the bottom-row of stitches directly to my other set of needles later.
When you cast on, leave a long tail of wool at the end - at least 20cm.
Step 3 - the brim (part 1)
You now knit the brim. Now preferences for how big to make the brim vary. I like a reasonably wide brim because it will be double-layered and go over my ears to keep them warm. You might like just a narrow one - just enough to provide a stretchy edge to keep your hat on your head. The cap pictured has only 8 rows, and my next cap will have 12. I'd recommend no fewer than 5, but the upper-limit is up to you.
So, I knitted 8 rows. as I went, I passed the tail back and forth so it wove in and out of the knitting as I went. this isn't entirely necessary - you can leave a "float", but I figured it kept it neat.
Then I purled one row. This is the row that is the turn-row and will be the bottom-edge of your cap. It must be purl to create a neat groove in the knitting with which to fold neatly.
Now... knit just two more rows and stop.
Step 4 - the brim (the crocheted edge)
the extant pics of the monmouth caps seem to have a row of what could be "cast on" stitches... but I think look far more like a row of crocheted loops.
I experimented with doing this on my own cap, and decided a) it looks pretty and b) it creates a stronger edge to the cap, which would lead to it being less likely to stretch out of shape. So I think it's a good idea.
So I did it at this point.
Hold the ball of wool "inside" the circle of knitting (on the wrong side of the knitting). Your crochet hook is on the "outside" of the knitting. Push your crochet hook through the knitting just *above* the line of purl stitches (into the first "V") and draw a loop of the wool through to the "front". Make sure that the wool is reasonably tight. You don't want any slack causing the very last *knitted* stitch to be all loose. Pull any slack through to ensure this.
Now move the crochet hook to the next purl stitch and do this again, drawing the next loop through the loop currently on the hook (and letting the first loop slide off the hook). Continue like this around the whole brim of the hat.
Be careful not to make loops into every half-stitch. Make sure there's one loop for each "V" of knitting - it sits better that way).
When you get to the end... don't let go of the last loop. you are now about to make the "loop" that is characteristic of the monmouth cap.
Step 5 - the loop
I wasn't at all sure what the loop was for - until a friend suggested that it would be perfect for hanging your cap on a hook on the wall - either to let it dry or just to store it. That sounds good to me, but it would need to be fairly sturdy - in order to take the weight of a sodden wool cap. Thus I decided to make sure this loop was double-thick.
Grab the long-tail of wool from your original cast-on, and add it to the current ball-wool so that you are now going to crochet with both strands of wool at once.
Use these to crochet a chain. The length can be variable depending on how long you'd like the loop to be./ I'd recommend around an inch in length.
Now, do one more loop-stitch into the brim of the hat - pushing the crochet-hook through the very first chain-stitch you crocheted into the brim. Make sure the loop isn't twisted...
Now, with the loop currently on the crochet hook - pull the wool through to make the loop bigger (be careful not to pull through the end of the cast-on tail).
Bring the tail+ball over the edge of the knitting and through this loop, and pull the loop closed to finish it off.
Now, with your crochet hook, push it through from the *back* of the knitting, through the *second* of the very-first crochet-stitches you made, and draw the remaining "tail" (from the cast-on) back through to the back of your knitting.
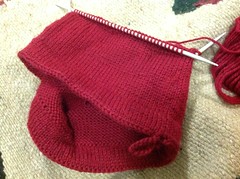
Step 6 - the brim-turn
So, now you're ready to continue knitting. You can just put the ball of wool back where you need it to continue knitting.
I knitted another 6 rows, so that the total number of rows on this side of the brim was also 8 (to match the first 8 rows). Obviously you'll continue until you reach the number you want.
Now comes the tricky part.
First: fold the brim so that the "wrong" side of the knitting is hidden away, and the bottom edge is matched to the top edge. These should match well. If they don't - you've either knitted one too many, or one too few rows... fix that before you continue or you'll be sad when the brim doesn't sit right.
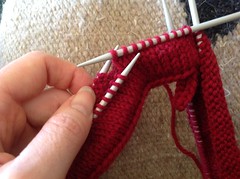
Now - you need to pick up stitches from the bottom edge using your second set of circular needles. obviously - it must be exactly the same number of stitches as you initially cast on.
The really tricky part is next. Hold the brim so that it's folded correctly and you have the two sets of circular needles next to each other.
You are now going to knit a stitch from each-needle together to seal the brim edges together.
To do this, for each stitch you will work a variant of "slip one knit one, PSSO", but with two needles. I'll call them "front" and "back" needles.
- slip a stitch from the front left-needle onto your right-hand needle.
- knit into a stitch from the back left-needle
- Pass the slipped-stitch from your right-needle over the new-knitted stitch
Do this all the way around, until you have just one row of stitches once more.
Congratulations, that was the trickiest part. It's all downhill from here.
Step 7 - the "body" of the hat.
So earlier we measured the "body" of our hat... so now... you just need to keep knitting until your knitting (including the brim) reaches that length.
Step 8 - decreasing
This is a bit rough-and-ready, but my decreases ran roughly thus:
(K5 K2tog)* repeat to end (15 repeats for my 120 stitches)
Knit 4 rows
(K4 K2tog)* repeat to end (again 15 repeats, and they should be at the same point)
Knit 3 rows
(K3 K2tog)* repeat to end
Knit 2 rows
(K2 K2tog)* repeat to end
Knit 2 rows
(K1 K2tog)* repeat to end
Knit 1 rows
(K2tog)* repeat to end
Knit 1 rows
(K2tog)* repeat to end
(K2tog)* repeat to end
At this point there should be about 6-8 stitches left.
Cast these off - and the knitting will naturally form a little round "button". you can make this bigger if you like... but this is where I stopped.
Congratulations - you're done.
Mine fits me nicely:
References
A Short History of the Monmouth Cap By Jennifer L. Carlson
Provides a good overview of period monmouth caps (including a picture of the only extant one) and an alternative pattern (with pics of the knitting as she goes along).
No comments:
Post a Comment