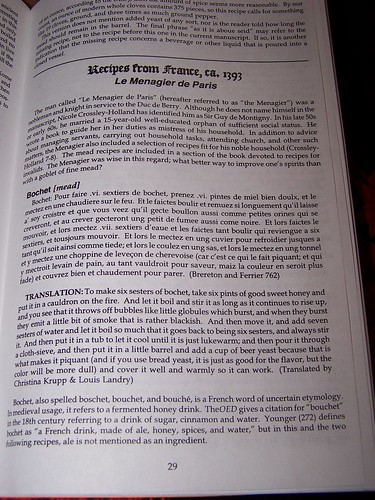
Being a description of how to make a "black mead" - which is a mead made from caramelised-honey. The modern description for this kind of mead is a "bochet", but I prefer to call it "black mead"(more on my thoughts on this later), which requires that you cook the honey down into toffee before mixing up the mead. I will be using the "bochet" recipe from Le Menagier de Paris (1393), which I took (including an English translation) from: Mead before Digby (2003)
Recipe
The original recipe (translated from old french)
TRANSLATION: to make six sesters of bochet, take six pints of good sweet honey and put it in a cauldron on the fire. And let it boil and stir as as long as it continues to rise up, and you see that it throws off bubbles like little globules which burst and when they burst they emit a little bit of smoke that is rather blackish. And then move it, and add seven sesters of water and let it boil so much that it goes back to being six sesters, and always stir it. And then put it in a tub to let it cool until it is just lukewarm; and then pour it through a cloth-seive, and then put it in a little barrel and add a cup of beer yeast because that is what makes it piquant (and if you use bread yeast, it is just as good for the flavour, but the colour will be more dull) and cover it well and warmly so it can work.
-- from Mead before Digby
My redaction
Ingredients
- 1.5 kg Nice dark honey (not the light stuff you buy on the supermarket)
- Ale yeast
- Hot water to make up a gallon
Equipment
Essential |
|
Safety equipment |
|
Highly recommended |
|
Basic recipe (quick overview - full method is below)
- Put saucers in fridge, start your yeast according to the packet (if necessary)
- Put honey directly into heavy pot with no other ingredients. Boil until it turns to hard toffee (about 1hr 30min, but check it periodically by spooning toffee onto your cold saucers)
- When the toffee is ready, prep your water (make sure it's *hot*), put your safety equipment on, and rapidly mix the water into the toffee. It *will* splash up high, so be careful!
- When thoroughly mixed, allow to cool to body temperature, add yeast and pour into carboy, add an airlock and it's ready to go.
In the section that follows, I'll show you step-by-step what I did, including pictures so you can see the colour of the honey-toffee as I went along. If you're new to brewing, and especially if you've never made toffee before - I strongly recommend reading through all this before trying it yourself.
In total, the cooking-time is about 2 hours. That includes prep and cleanup. Most of that will not require your constant attention - the honey will boil away on its own with minimal supervision and stirring for about an hour... most of the activity will happen in the last 30-45min.
The most time-critical step is the part between when the toffee is ready, and when you pour in the water. Toffee goes from "nearly done" to "burnt now" in only about a minute - so it's especially critical that you prepare your equipment (especially safety equipment) ahead of time.
Through the following section, I'll also discuss my choices and why I made them, some further information about the recipe in period, and some alternatives to use if you don't have access to what I used. This is a pretty simple recipe, when it comes down to it, so you've got a fair bit of flexibility in your alternatives.
Note: please take the safety equipment seriously - this stuff splashes high *every* time you do the water-mixing step. In fact, if you have the option to do this outside, that would be best, but be prepared for a fair bit of cleanup, and keep children and animals well away.
My Method
Start with prep.
Put your two saucers into the fridge to cool. We'll be using those later to test the viscosity of the toffee.
Check your yeast. If it requires preparation, you will need to start that now. It may even mean you need to start your toffee in a few hours' time... follow the directions on the package for the best results.
Prepare your safety equipment and lay it out within arms reach of your stove - you want this stuff available at an instant!
"take six pints of good honey"
Choosing your honey is probably "step 0" of the process. I chose a nice, dark leatherwood honey, rich in flavour (not random supermarket stuff). Honey-choice is really important in making good mead - it's worth paying a little extra for the better quality. The pale stuff you get from the supermarket is often cut with flavourless glucose (it's sweet, but that's all) to make the honey easy to pour. That's great if you want your honey to run easy onto your cereal, but if you want a nice, rich black mead, you'll need to choose something with a bit more body to it. Pick something up from a whole-foods place, or, better yet, find your local beekeepers hobby-group and buy some from there.
Now, I didn't use six pints of honey... because I have a standard 1-gallon carboy, and I wanted it to fit nicely. In period, they would have used whatever brewing vessel of whatever size they felt like... but I've adjusted the recipe to fit 1 gallon to be convenient. So I used 1.5kg of honey. I used Pichon's estimate for the size of a sester (as described in Mead before Digby), which translates to approximately three pounds of honey per gallon which in metric measurements is just under 1.5kg.
"put it in a cauldron on the fire. And let it boil and stir it"
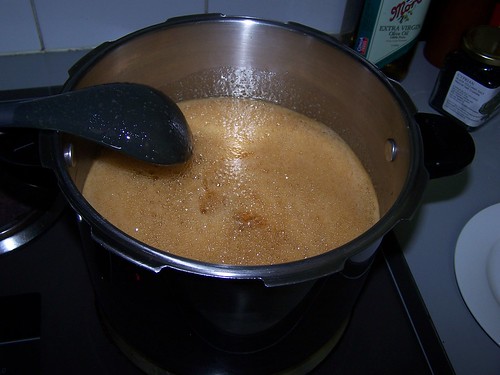
So, I put the honey on a big hotplate on low (1-2). No added water, just honey all by itself. It took about 30min to start bubbling like the picture. I know it went slower than if I'd put it on a higher temp, but I figured I should let it go *slooow*
Notice I'm using a *big* heavy pot. Heavy so the honey doesn't burn on, *big* because it swells up a *LOT* when boiling. You can see that it is now almost 3/4 filling the heavy pot - that's 1.5kg of honey in a 6 litre pot.
I didn't have to continuously stir it, just every now and then while I was continuing to prep dinner.
Let it boil
Caramelisation
The next picture is about 1 hour into the cooking. You can see the honey is getting darker in the picture below. The longer-chain sugars in the honey break down into shorter-chain ones, and the colour changes as well - this is called "caramelisation", and it has been going on for a while, but by now it's becoming obvious. It's also just beginning to smell of toffee at this stage. 1 hour sounds like a long time, but I wasn't having to stir it much at all - just let it bubble away while I got on with other things (nearby, you don't want to leave it unattended).
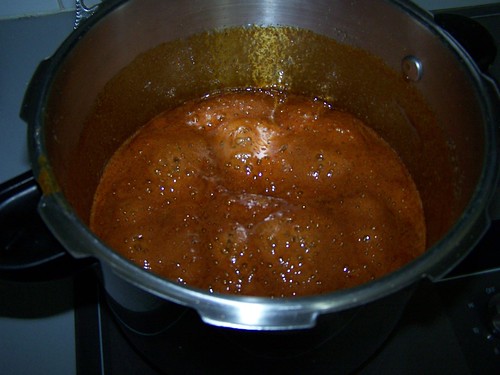
"it throws of bubbles like little globules that burst"
At about 1hr 15mins it starts to change... when I stir it now, it doesn't rise up in the same smooth way, but has started to boil in blobby sections like the picture below. I consider these things might be "globules" that are mentioned in the text. No sign of smoke...
I figure things are probably going to change reasonably quickly now, so I make sure I'm standing around nearby and watching and stirring.
Little globules that burst?
The toffee-test
So it's been a few more minutes, and now it's time to test whether the honey has turned into toffee yet. I took one of the saucers from the fridge, and dribbled a tiny dip of a teaspoon's worth of the honey onto a plate, it's now the consistency of soft toffee. It wrinkles when I blow on it.
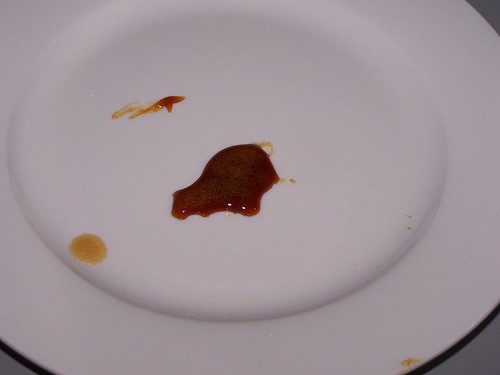
The toffee test
When it cools, I try dipping my finger into it to manually test the viscosity... the result: goopy
This is a good start, and it won't be long now.
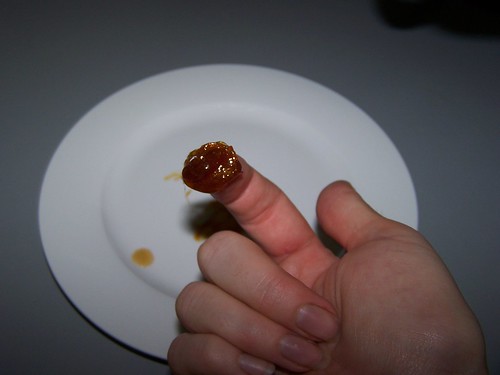
Goopy honey-toffee
"as long as it continues to rise"
The recipe calls for black puffs of smoke... so I leave the honey on for a bit longer.
In the next photo, it's 1 hr 30mins into the process and you can see the honey is now very dark. When I stir it now, it takes a long time for the honey to rise again, and it does form those globules of big popping bubbles as it does so.
It's "any minute now" territory... so it's time to put on your long-sleeve shirt. You can put the glasses and gloves on at the last minute, but a shirt takes a little time to put on, and this is the last calm before the storm.
After that, you should get your 4 litres of hot water ready - in your easy-to-pour vessel. Have it close to hand.
Dark honey-toffee
I do another toffee-test on the second saucer
The toffee is now rock-hard when it drops on the plate. Still no black smoke, and it does *eventually* rise after stirring... but I figure I don't really want it to taste like charcoal, so for me, this is good enough.
hard honey-toffee
"then move it and add seven sesters of water"
Now, switch the stove off and if possible, move the pot to another (cold) hotplate. You are about to pour the hot water into it.
Toffee and water (even hot water) don't mix very well. In this case, the first bit I poured in made it furiously explode hot toffee all over the stovetop (it jumped 25cm above the edge of the pot). I was unprepared for the viciousness of this bubbling, and I lucked out... but you are forewarned and should take all possible precautions so as not to lose an eye, or scald yourself into the ER. I've heard enough stories from people trying to make this stuff to be thoroughly convinced that serious safety precautions are in order.
Put on your safety glasses and your heavy gloves now.
Keep your face and hands as away as you can as you pour in half of the 4 litres of hot water. It *will* splash up a lot (it will leap over the edge of the pot). As soon as it settles, stir - if possible, stir immediately after pouring the hot water. This would be easier if there were two of you doing this - and then stir in the rest of the hot water.
When I did this, it boiled and splashed up everywhere, and I was concerned that the toffee would harden and not mix in, but after the first pour, the mixing went fairly well, and you can see it mixed in nicely.
Water and toffee don't mix easily
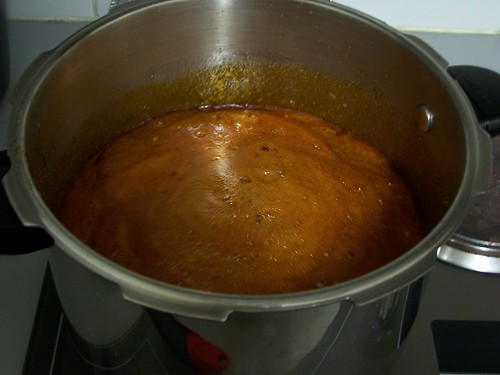
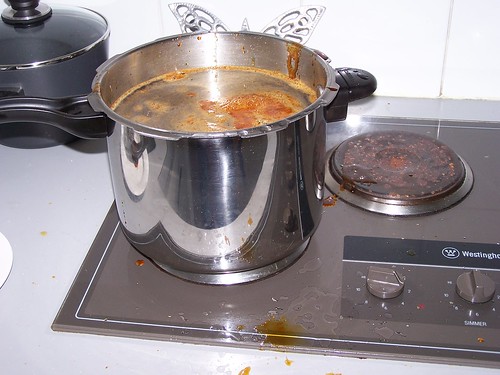
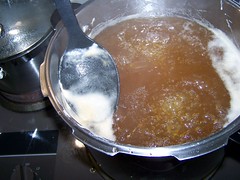
"let it boil... [until] it goes back to six sesters"
You can see the colour of it: it's dark and rich.
I chose not to boil it until it lost a seventh of itself. I just added a little less water to begin with. My decision was based on the fact that I don't need to purify my drinking water (I'm not using random river water) - and I didn't want any more charcoal-flavours from more cooking... so I just reduced the amount of water to add by a little instead.
I did bring it back to the boil for a few minutes. This ensures a sterilised brew, which gives the yeast a free run to get established.
!["let it boil... [until] it goes back to six sesters"](https://farm9.staticflickr.com/8209/8176404353_f2f1e91d17.jpg)
Black mead
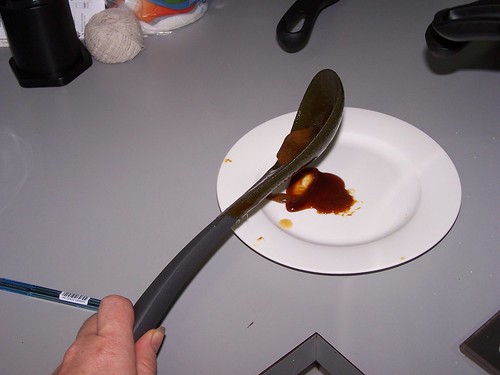
"let it cool... then pour it through a cloth seive"
Let it cool! This is an important step - as the brew will currently be too hot to pour directly into the carboy. if it's glass, it may crack, if it's plastic, it'll melt - either way, not a fun experience. Likewise, the heat will kill your yeast... So, wait until it's body-temperature before beginning this step.
I actually forgot to pour it through a cloth sieve. That actually would have been a good idea. You can see little particles of crud sticking to the funnel - presumably the proteins in the honey all coagulated. But you can do it. Put some muslin into the funnel and pour the brew slowly through it, in order to remove the fine particles.
In my case, the extra crud didn't change the flavour, but I had more lees to rack (including a few annoying fine granules that didn't settle out easily).
Note: boiling honey (and skimming the scum which rises) was a common part of period mead recipes. The scum tends to be the honey proteins, which are normally suspended in the mead, but boiling it off causes them to coagulate, and removing them tends to lead to a clearer resulting mead. So if I'm right about the granules being the same stuff - straining them out might make the mead clearer... though the end-product of this recipe is so dark you can hardly see through it without a torch anyway, so it's up to you.
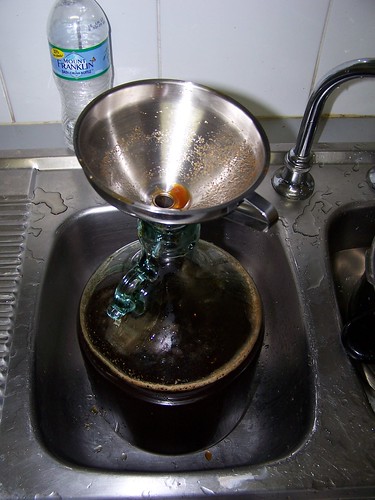
the pour
"put it in a barrel and add a cup of beer yeast"
Well, I had been going to add ale yeast (one of the wyeast smack-packets), but turns out I didn't remember to get it started until way too late... and they really do need a warm-up period. So instead, I added my usual favourite: Lalvin EC1118. I like it because it's clean-tasting and quick and easy to use - it will start without preparation. It's also a very dominant species of yeast that will kill anything it its path (which makes it great when you use fruit which may have wild strains of yeast and bacteria that could lead to off flavours).
The downside to EC1118 is that it's very high attenuation - which means it can put up with a high level of alcohol - which in turn means it turns a lot of sugars into alcohol... which means that your result will be quite dry.
It was, however, the only thing I had to hand that could be added instantly and Just Work.
In a pinch, you could likewise use a Safale yeast or other dried packet - most of which are usually pretty good at starting from scratch (rather than requiring a starter), but if you have time to prep - then it's best to do so and let the yeast get ready before throwing it in.
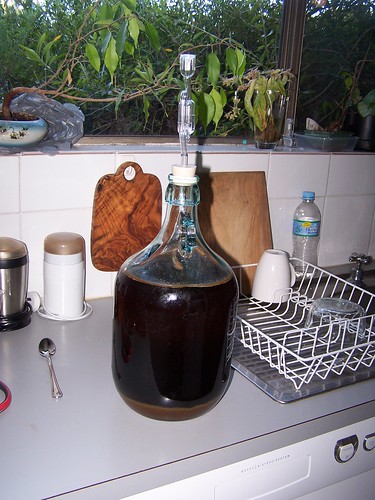
"cover it well and warmly so it can work"
I popped an airlock on and left it in my kitchen, covered in a towel to keep it warm overnight.
Here it is in the bottle the next morning. It's very dark. I really think this should be called "black mead".
The modern terminology for a caramelised-honey mead is "bochet", but there are two other "bochet" recipes from "Le Menagier" listed in Mead before Digby that do not caramelise the honey at all. The author also points out that in period, "bochet" just meant a fermented honey drink (ie a mead) (you can see this discussion in the photograph in the sources section below).
It seems that it is only in the modern-day that we use the term "bochet" specifically to refer to the caramelised version.
In my (totally unresearched) opinion, I would have called this stuff "black mead" which I think is more apt. In modern usage "black mead" refers to melomel with black-currants in it... but it would not have had this connotation in period (at least, I've seen no recipes for such in any of our period sources, and melomels were only just barely in period)... and yet black mead was known at this time... so my guess it that *this* is a more likely candidate for the name.
Final result
I left it in the bottle for about six months, and it is the most delicious-tasting thing - it tastes like caramel/toffee in a bottle. Really lovely, and a brew that I will repeat!
Black mead
The full set of photos is in my Bochet album on flickr
What I'd do differently
1. Safety equipment
I'd use it
I know I've harped on about this already a bit, but I have made toffee many times before... and even I was shocked at the ferocity of the water-mixing stage of this recipe. This time I lucked out... you are not likely to, and neither am I a second time.. so next time (and every time thereafter) I will use proper safety equipment.
2. Yeast choice
I'd use some ale yeast, or at least a lower attenuation yeast
When I compared the end-sweetness of this recipe to my "normal" mead... I found it even dryer than usual. My (totally unresearched) opinion on this is that I suspect that the toffee-making process changes the availability of various sugars - it breaks long-chain sugars into shorter-chain sugars, and short chain sugars are much easier for yeast to digest. Thus the strong variety of yeast I used simply ate it all up. The result was nice, but I think it'd be even nicer if it were a little sweeter (toffee should be sweet, after all).
3. More of it
I'd make more!
This was a really tasty brew... and totally different to all the other stuff I've made. I would make it again, and possibly see if I could make it in larger quantities. That would require some more logistical issues - given the way it boils up... but the result is worth it :)
Sources
Mead before Digby
Christina M Krupp and Bill Gillen(2003)
Making medieval Mead or, Mead before Digby (Compleat Anachronist #120)
The Society For Creative Anachronism Inc
Relevant page to this recipe: p29
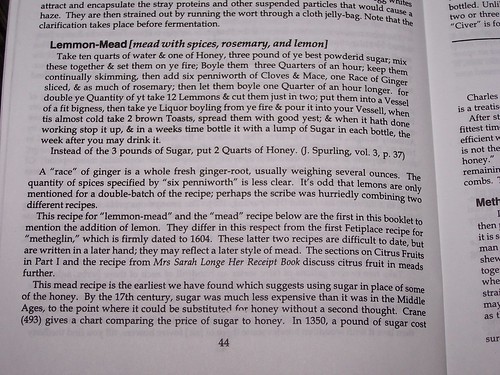
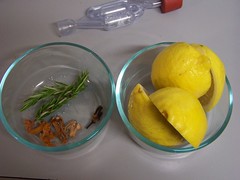
!["then add [the spices] and boyle them one quarter of an hour longer"](http://farm9.staticflickr.com/8512/8501968051_22fbe76195_m.jpg)
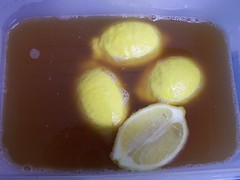
!["take [lemmons] and put them in a vessel ... take the liquor boyling...& pour it into the vessel"](http://farm9.staticflickr.com/8230/8501968267_e3de0a73db_m.jpg)